|
|
| |
|
|
How to play battleship
|
Let's take a quick look at the
game panel.
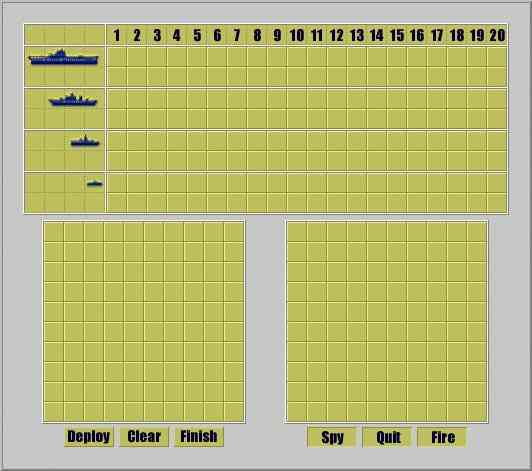
You will find that it comprises three
parts:
- the score board on the top
- the deployment array on the bottom-left
- the battle array on the bottom-right.
We begin with the deployment array.
|
|
| Close
Window |
|
| Warship types |
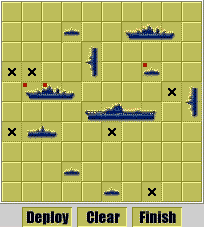
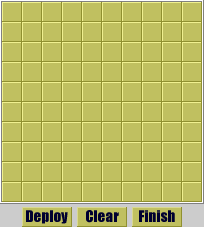 The 10x10 deployment
array, as shown on the left, let you deploy the warships and
show you where your opponent hits. The 10x10 deployment
array, as shown on the left, let you deploy the warships and
show you where your opponent hits.
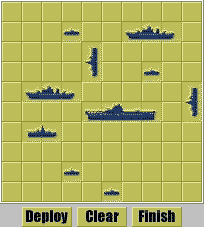
We have 10 warships in 4 types, they are:
 |
(Aircraft Carrier) x 1 |
 |
(Cruiser) x 2 |
 |
(Destroyer) x 3 |
 |
(Submarine) x 4 |
The warships have different capacities.
An Aircraft Carrier has the capacity of 4, a Cruiser has that
of 3, a Destroyer has 2 and the Submarine has 1.
The capacity indicates how many boxes
a warship occupies in the 10x10 array. A warship is sunk if
all the boxes it occupies have been shot.
|
|
| Close
Window |
|
| Warship deployment |
We have two rules on warship
deployment:
- a warship can only be deployed horizontally of vertically
in the 10x10 array
- any two warships can not have any connections in the horizontal
and vertical directions
You might not be familiar with these
rules at a glance. Never mind, we can help on it.
 There are 3 buttons controlling
the deployment array: There are 3 buttons controlling
the deployment array:
- [Deploy]: to deploy automatically all not-yet-deployed
warships
- [Clear]: to un-deploy all the warships
- [Finish]: to finish deployment and get ready to fight
Pretty cool, isn't it? Got some ideas
of the deployment rules?
How about if we don't like the arrangement
generated by the computer?
 No problem. We can deploy and
un-deploy all the warships with our mouse clicks. No problem. We can deploy and
un-deploy all the warships with our mouse clicks.
Remember the capacity? We can tell the
type of a warship by its capacity. So all we need to do when
deploying a warship is to click two boxes to specify its capacity,
horizontally or vertically of course.
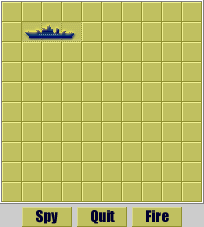
As shown on the left, we are to deploy
an Aircraft Carrier which has the capacity of 4.
To un-deploy a warship, just click on
it.
As you might already know, you can click
twice on the same box to deploy a Submarine.
|
|
| Close
Window |
|
| Choose targets |
 Wooh, we are ready
to fight. Wooh, we are ready
to fight.
Here comes another 10x10 array with
new buttons. It sits in the bottom-right area of the game panel.
We can call it the battle array.
The battle array let you choose bomb
targets, fire bombs, place marks and even let you peek at the
deployment of your opponent's warships.
Sounds interesting? Let's go through
all of them one by one.
Question[1] : How to choose the targets?
Answer[1] : point and click on any vacant boxes
within the battle array.
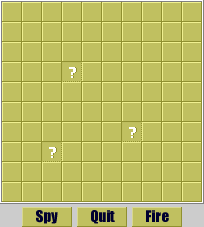 As you click on a vacant box,
it changes to a question mark "?". As you click on a vacant box,
it changes to a question mark "?".
You can click on as many vacant boxes
as you want for conjecturing and marking purpose, but you can
only shoot three targets in each turn.
So you should release those additional
"?"s, or turn them into marks, then
click the [Fire] button when you've made up your mind on your
three targets(you will learn how to release a "?" and how to
mark a box later).
|
|
| Close
Window |
|
| Shot or missed? |
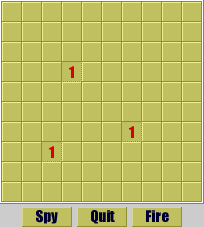 Not bad, your bomb
hits. Not bad, your bomb
hits.
When you click the [Fire] button, you
will notice that the 3 targets you chosed change into numbers.
The numbers will act as the bomb counter,
or the turn counter. You have totally 20
bombs(3 targets per bomb) for each game, and
your opponent won't have more bombs than you.
As a result, the red numbers indicate
that you shot something in that turn, and the black ones indicate
that you missed.
Question[2] : How can we know what exactly we've
shot in each turn?
Answer[2] : ... most of the time, you will have
to guess.
The bomb numbers only indicate whether
you shot or not, and the score board tells you how many hits
you've made and what types of warship you've shot, then you
make your own judgement based on the warship deployment rules
and the possible combination of bomb numbers to identify what
you've shot and what to shoot next.
For example, if your score board shows
that your opponent's Cruisers have received two hits, it could
be the same Cruiser that receives two hits, or each Cruiser
receives one hit. That's the attraction of the game.
So, you might want to check out the
score board now.
|
|
| Close
Window |
|
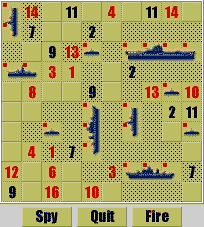
| The score board |
Question[3] : What is the score board?
Answer[3] : The score board shows how many hits
you've made and what types of warship you've shot in each turn.
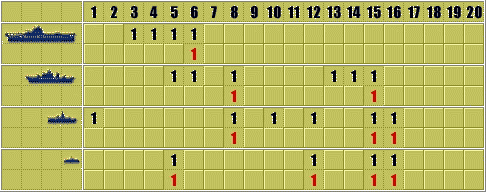
The row on top is the bomb/turn counter.
A bomb won't be shown on the score board if it missed.
There are two rows for each type of
warship. The upper row is the hit counter which tells how many
hits you've made to this type of warship(indicated by black
numbers), and the lower one shows how many warships of this
type are sunk in each turn(indicated by red numbers).
For this case, let's see what happened
with reference of the battle array.
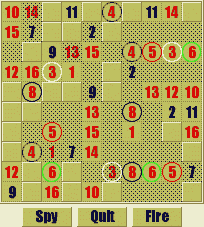 We shot the Aircraft Carrier
with Bomb[3] and were lucky as we decided to try the top-right
target of Bomb[3] first. In the following hits with Bomb[4],
[5] and [6], we sank the Aircraft Carrier. We shot the Aircraft Carrier
with Bomb[3] and were lucky as we decided to try the top-right
target of Bomb[3] first. In the following hits with Bomb[4],
[5] and [6], we sank the Aircraft Carrier.
We were also lucky to make a "Strike"
with Bomb[5], but we didn't know which target is the Cruiser.
With Bomb[6], we shot the Cruiser again, so when we looking
at the combinations of the [5]s and [6]s, it could be a Cruiser
sitting horizontally in the bottom-right area, or two Cruisers,
one on the left side and the other one on the right side(it
couldn't be a Cruiser that deployed vertically in the bottom-left
area since we didn't hit a Cruiser with Bomb[1]).
We got it with Bomb[8] and thus we knew
that the target of Bomb[5] on the middle-left side was a Submarine.
On the other hand, we kept searching
for the Destroyer found with Bomb[1] and finally we made it
with Bomb[8] as well.
Likewise, and with luck, we sank the
other warships and won the game by Bomb[16]. |
|
| Close
Window |
|
| Mark a box |
 You might already
notice that we have some spotted boxes in the battle array. You might already
notice that we have some spotted boxes in the battle array.
According to the warship deployment
rules, if you found one of your opponent's warships, then the
boxes around it vertically and horizontally won't be occupied
by any other warships. It's a good idea that we mark down these
boxes so we won't waste our bombs on them by mistake.
We mentioned that when you click on
a vacant box, it changes to a "?". Well, if you click on it again, it
changes to a spotted box and the "?" is released, it will change back to
a vacant box with one more click.
So a box changes among "vacant", "?"
and "spotted" with clicks.
You can spot a number as well. Click
once to spot it and click again to restore it.
The spotted boxes and numbers help you
to make clearer judgement when choosing targets.
|
|
| Close
Window |
|
| How to win? |
 Question[4] : How can we know where the opponent
shoots? Question[4] : How can we know where the opponent
shoots?
Answer[4] : In your deployment array, a black
cross means your opponent missed, a little red spot at the top-left
corner of the ship body means your ship was shot.
You can win in two ways, to destroy
all the opponent's warships before the opponent sinks yours,
or to hit more targets than your opponent does when the game
finishes.
If it's too much for you, you might
want to consider sending a SPY.
 When you click on
the [Spy] button, it shows randomly one of your opponent's survived
warships for 1 second(hot
games always come with cheat codes, so do cool games). When you click on
the [Spy] button, it shows randomly one of your opponent's survived
warships for 1 second(hot
games always come with cheat codes, so do cool games).
For this example, it's a Cruiser.
You have only three spies for each game,
use them wisely. Usually, I use the spies to find out the opponent's
Submarines for the last few bombs.
 When the game finishes, your
opponent's warships will be shown in the battle array. Now you
can compare your judgement with your opponent's actual deployment. When the game finishes, your
opponent's warships will be shown in the battle array. Now you
can compare your judgement with your opponent's actual deployment.
Use the [Fire] button to switch between
hiding and showing those warships, and click on the [Quit] button
to start a new game. The result of our case is shown on the
left for your reference.
Congratulations! You are now ready to
go on board.
|
|
| |
|
|
